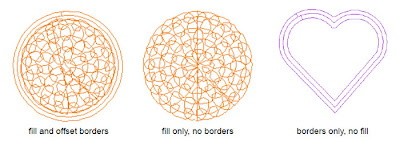
Compound Chenille effect generates multiple offset runs automatically from the same boundary as the fill. You can set up to 3 offsets before and after the fill, each with their own values for the offset distances, as well as Chain, Moss and needle height.
Digitizing chenille automatically with Compound Chenille
Using Compound Chenille allows you to:

To digitize chenille automatically with Compound Chenille
1. Click the Chain or Moss icon.
2. Click the Compound Chenille icon.
3. Select a chenille fill stitch.
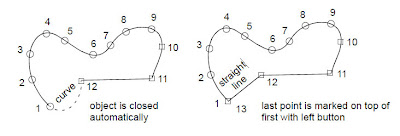
4. Digitize the boundary of the shape using Complex Fill, by marking reference points around the outline of the shape.
Tip Use the prompts in the prompt line to help you digitize. If you make a mistake, press Backspace to delete the last reference point. Press Esc to undo all new reference points. Press Esc again to exit digitizing mode.
5. Close the shape.

6. Press Enter.
7. Mark the entry and exit position by clicking outside the object boundary.
Tip To minimize segments and gaps in your embroidery, place the entry and exit points opposite each other on the outside boundary. Then define the stitch angle so it is perpendicular to the line between the entry and exit points.
8. Define the stitch angle by digitizing two points.

9. Press Enter.
Note Complex Fill objects may be stitched out in several smaller segments, joined by travel runs. All segments and boundaries in a Complex Fill object are part of the same object.


