Your Ad Here

Adjusting automatic offset stitch type and values

Friday, May 8, 2009
Adjusting automatic offset stitch type and values
The offset is the border around the filled shape. A border can be added before and/or after the fill. You can change the stitch type and the width of the offset.


For the Before Fill offset, you can adjust the number of overlapping stitches, run direction, offset stitch type, offset distance, needle height and stitch length for Moss and Chain stitches.

For the After Fill offset, you can adjust the fill stitch offset distance, offset stitch type, offset distance and needle height.


To adjust automatic offset stitch tpe and values

1. Select the object.
2. Right-click the Compound Chenille icon.
The Effects > Compound Chenille tab opens


Adjusting automatic offset stitch type and values

3. Select the Compound Chenille checkbox.
4. Enter the number of overlapping stitches between the offset runs.
Overlapping Stitches allows you to shift the connectors between Offset Runs by a few stitches to prevent stitches building up at the joins. Also, the connectors are less visible if they are not in one line.


Adjusting automatic offset stitch type and values

5. Select the run direction for the offset borders

  • CW: to stitch in a clockwise direction

  • CCW: to stitch in a counterclockwise direction
  • The correct stitching direction is important for Moss borders.

    6. Select the outline stitch length.
    Outline Stitch Length allows you to set the stitch length for either Moss or Chain stitch boundaries.
    7. Decide how many offset boundaries to generate before the shape is filled.
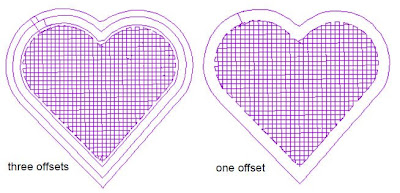
  • Offset 1, 2 and 3 sets the number of offset boundaries of the shape are used with either Moss or Chain before the fill stitching. The stitch boundaries are generated before the fill stitching. They hold the fabric in place and provide clearer edge definition for shapes. Offset Moss or Chain stitch outside is used as highlight.


  • Adjusting automatic offset stitch type and values

  • Needle Height controls the height of the loop formed by the
    Chenille machine when it is sewing a Moss stitch, and the width of the Chain stitch.


  • Adjusting automatic offset stitch type and values

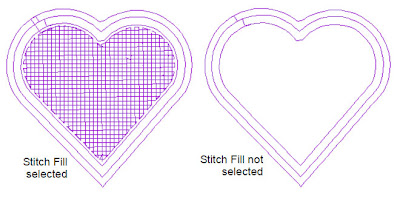
    8. Select the Stitch Fill checkbox to fill the shape with stitches.

    If it is cleared, the shape will not be filled.


    Adjusting automatic offset stitch type and values

    9. Enter a Fill Offset Distance.

  • Fill Offset Distance sets the distance between the digitized boundaries and the filled area. It is always measured from the digitized boundary, not from the last Offset Moss or Chain stitch. Enter 0.0 mm to set the edge of the filled area on the digitized boundary. Enter a positive value to set the edge of the filled area inside the shape. Enter a negative value to set the edge of the filled area outside the shape.


  • Adjusting automatic offset stitch type and values

    10. Decide how many offset boundaries to generate after the shape is filled.

  • Offset 4, 5 and 6 allow you to stitch multiple offset boundaries of the shape with either Moss or Chain. The stitch boundaries are generated after the fill stitching. Offset (Units) specifies the distance between the digitized boundary and the Offset. Enter a positive value to generate parallel Offsets inside the shape or a negative value to generate Offsets outside the shape.

  • Needle Height controls the height of the loop formed by the Chenille machine when it is sewing a Moss stitch, and the width of the Chain stitch.


  • 11. Click OK.