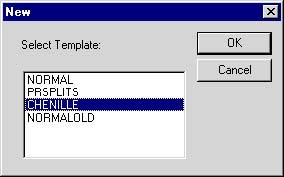
When you start Wilcom ES Chenille, a new file — Design1 — is automatically created, ready for you to start digitizing. By default, Design1 is based on the NORMAL template. However you need to use a Chenille template to create new Chenille designs. The Chenille template defaults the system to Chenille values. You can modify the template to suit your machine. See Modifying a template in the Wilcom ES User Manual for further details.
Use a Chenille template to create new Chenille designs. The Chenille template defaults the system to Chenille values. You can modify the template to suit your machine. See Modifying a template in the Wilcom ES User Manual for further details.
To create new designs with the Chenille template
1. Start ES Designer.
2. Select File > New. The New dialog opens.

3 Select a Chenille template.
The Chenille template defaults the system to Chenille values. You can modify the template to suit your machine. See Modifying a template in the Wilcom ES User Manual for further details.
When you read a design from an embroidery disk, they are converted from embroidery file format to EMB format. The Chenille functions appear in the converted design in the same way as they are stored in the embroidery format file, or on the paper tape.


