Your Ad Here

Converting a Complex Fill object to a chenille object

Sunday, May 31, 2009
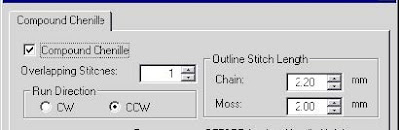
You can convert a Complex Fill object to a chenille object uing Compound Chenille. This will add offset borders and a chenille fill. Multiple offset runs are generated automatically from the same boundary as the fill.To convert an embroidery object to a chenille object1. Select the Complex Fill object.2. Click the Chain...
Read more »

To set the offset needle height

Wednesday, May 27, 2009
1. Select the Compound Chenille object.2. Right-click the Compound Chenille icon.The Effects > Compound Chenille tab opens3. Select the height required for offsets before and after fill.4. Click ...
Read more »

Setting the offset needle height

Saturday, May 16, 2009
The Needle Height controls the height of the loop formed by the Chenille machine when it is sewing a Moss stitch, and the width of the Chain stitch.Moss can be stitched using different needle heights: lower for run around and higher for fill. In conjunction with Chain stitches, the design builds up in height from the edges...
Read more »

Adjusting automatic offset stitch type and values

Friday, May 8, 2009
The offset is the border around the filled shape. A border can be added before and/or after the fill. You can change the stitch type and the width of the offset.For the Before Fill offset, you can adjust the number of overlapping stitches, run direction, offset stitch type, offset distance, needle height and stitch length...
Read more »

Adjusting offset stitch length

You can adjust the length of the Chain and Moss offset stitches. Stitch length should be constant for the same thread type throughout a design. If the stitch length varies, the height of the Moss loops and the width of the Chain loops will also vary, causing uneven embroidery. The Chenille machine pulls up the same length...
Read more »

Changing run stitch direction

You can set the run stitch direction for the offset borders. The correct stitching direction is important for Moss borders.Changing offset stitch direction1. Select the Compound Chenille object.2. Right-click the Compound Chenille icon.The Effects > Compound Chenille tab opens3. Select the run direction for the offset...
Read more »

Changing the number of overlapping stitches

Overlapping Stitches allow you to shift the connectors between Offset Runs by a few stitches to prevent stitches building up at the joins. Also, the connectors are less visible if they are not in one line.To change the number of overlapping stitches1. Select the Compound Chenille object.2. Right-click the Compound Chenille...
Read more »

Adjusting the Compound Chenille values

The Compound Chenille dialog allows you to: set the number of offset runs stitched before the fill , including a run on the actual boundary, or none at all set the offset distance for fill, and fill is generated or not set the offset distance for 1st offset run (offset values multiply for multiple runs) or set individual offset distances for offsets (distances may be positive or negative) overlap stitches on the offsets change the run stitch direction,...
Read more »

Adding automatic offset borders after the fill

You can add up to 3 offsets after the fill, as well as Chain, Moss and needle height.. Offset Moss or Chain stitch generated inside the shape is used to define the shape.Enter a positive value to generate parallel offsets inside the shape or a negative value to generate offsets outside the shape.To add automatic offset...
Read more »

Adding automatic chenille fill

You can choose to include or exclude the fill stitch. Exclude the fill when you are digitizing multiple chenille objects using Input A, B or C and only need the automatic offsets for the border. This technique is used to generate multi-colored chenille objects. You can also set the distance of the fill from the border.To...
Read more »

To add automatic offset borders before the fill

1. Select the Compound Chenille object.2. Right-click the Compound Chenille icon.The Effects > Compound Chenille tab opens3. Select the Compound Chenille checkbox.4. Decide how many offset boundaries to generate before the shape is filled. Select a stitch type for each of the offsets, Offset 1, 2 and 3 from the dropdown...
Read more »

Adding automatic offset borders before the fill

You can add up to 3 offsets before the fill. Set the distance between the digitized boundary and each offset, as well as Chain, Moss and needle height. The stitch borders hold the fabric in place and provide clear edge definition for shapes.Offset Moss or Chain stitch generated inside the shape is used to define the shape,...
Read more »

Digitizing chenille automatically

Compound Chenille effect generates multiple offset runs automatically from the same boundary as the fill. You can set up to 3 offsets before and after the fill, each with their own values for the offset distances, as well as Chain, Moss and needle height.Digitizing chenille automatically with Compound ChenilleUsing Compound...
Read more »

Digitizing Automatic Chenille

Thursday, May 7, 2009
Objects stitched with a Chenille stitch need to have a border stitched around to hold the stitches inside the shape and provide clearer edge definition for shapes. Offset Moss or Chain stitch generated inside the shape is used to define the shape, while outside Offset Moss or Chain stitch may used as a highlight.This can be done autoamtically using the Compound Chenille tool with Complex Fill, when multiple offset borders can be automatically generated...
Read more »

Saving designs

ES Designer lets you save designs in native EMB as well as other ‘outline’ and ‘stitch’ file formats. You can also save designs to proprietary embroidery disks, or punch them to paper tape. Saving a design records its file name, location and format, and updates it with any changes you make. When you save an existing design...
Read more »

Creating new designs with the Chenille template

When you start Wilcom ES Chenille, a new file — Design1 — is automatically created, ready for you to start digitizing. By default, Design1 is based on the NORMAL template. However you need to use a Chenille template to create new Chenille designs. The Chenille template defaults the system to Chenille values. You can modify...
Read more »

Opening Chenille designs

Chenille designs cannot be distinguished from normal embroidery designs automatically. The system maintains the previous setting, so it is not necessary to select the machine format in the Decoding Options dialog, if you want to read an embroidery file with the same machine format as the previous design.To read a Chenille...
Read more »

Chenille Basics

To start using Wilcom ES Chenille, you need to know basic procedures, such as starting up, opening and creating designs, and saving. Refer to the Wilcom ES User Manual for more information on basic procedures.Security access codes control your access to special options in the software. You need to be able to identify your...
Read more »

Combining Chenille and lockstitch designs

Chenille designs can be converted to any machine format, including lockstitch machines. This is useful when you wish to combine regular embroidery and Chenille embroidery in a single design. You can combine regular lockstitch embroidery and Chenille embroidery in a single design.When using a machine that supports both lockstitch and ES Chenille, it is possible to change a lockstitch object into a chenille object by selecting it and clicking on a...
Read more »

Chenille toolbar

If you have a Chenille option added to your lockstitch Wilcom ES system, you have a single design window for both Chenille and normal embroidery.There is a special Chenille toolbar which contains special Chenille stitch types and machine functions, such as Straight, Coil, Perpendicular Fill, Compound Chenille, Chain, Moss,...
Read more »

Stitch length

Stitch length should be constant for the same thread type throughout a design. If the stitch length varies, the height of the Moss loops and the width of the Chain loops will also vary, causing uneven embroidery. The Chenille machine pulls up the same length of yarn for each loop according to the current needle height...
Read more »

Jumps

Jump(M) functions cause frame movements without needle penetrations. The use of jumps is not recommended because the pulling effect on the fabric during a jump, may distort the design, especially if the fabric is thin.To avoid long connecting stitches, plan carefully in which order you digitize the shapes and lines. Use Chain stitch rather than jumps when traveling across a shape filled with Moss stitching as the Chain stitch will be hidden under...
Read more »

Corners

Avoid corners with an angle smaller than 60o it can cause a machine fault or loop stitches may be changed to chain stitches. ES Designer automatically adds an extra stitch to avoid sharp corners within objects, including manual stitch objects. If you round off sharp corners in run and complex fills, you can avoid both sharp angles and small stitches.However sometimes an extra stitch causes chain stitches to swell, giving a poor finish.Use Smart Corners...
Read more »

Jumps

Jump(M) functions cause frame movements without needle penetrations. The use of jumps is not recommended because the pulling effect on the fabric during a jump, may distort the design, especially if the fabric is thin.To avoid long connecting stitches, plan carefully in which order you digitize the shapes and lines. Use Chain stitch rather than jumps when traveling across a shape filled with Moss stitching as the Chain stitch will be hidden under...
Read more »

Trims

Few Chenille machines have an automatic thread trim mechanism as the connecting threads are under the fabric and are not visible. In this case, digitize all the shapes and lines of the same color in one session to minimize the number of manual trims. This will reduce the time required to stitch the design.Be careful how you connect from one spot to another. Avoid long connecting stitches which may pull the previous stitching and may need to be trimmed.HUAAAAAA...!!!...
Read more »

Scaleability

As with lock stitch designs, any Chenille design created in ES Designer will be scaled from the outlines. But because parallel offset runs are used so frequently, Chenille users have to apply some thought and some special techniques to their digitizing.Object-based embroidery means that when designs are scaled, the stitches are automatically recalculated from the object outlines. Densities are preserved and there are no gaps or heavy over-stitching....
Read more »

Chain/Moss view

Wednesday, May 6, 2009
Chenille embroidery objects can be viewed in a special mode allowing easy identification of Chain and Moss design elements. A design displays using the first three colors in the color palette, which identify lockstitch embroidery objects in green, Chenille chain elements in blue and Chenille moss elements in red.TrueView™...
Read more »

Needle height

On some machines the needle height can be set in the design to control the height of the loop formed by the Chenille machine when it is sewing a Moss stitch, and the width of the Chain stitch.Moss can use different needle heights. You may use different needle heights for different color areas. You may also use different...
Read more »

Compound chenille

Compound Chenille is used with Complex Fill is used to automatically digitize objects with offset borders. Automatic offsets consist of 1-3 chain runs around the shape, 1-3 moss runs of a lower height and a fill of Island Coil, Perpendicular Fill or Straight stitch.Note Input A, B and C do not produce automatic borders...
Read more »

Fill stitch types

There are four fill stitch types available — Coil, Straight, Perpendicular Fill and Island Coil. The stitch type you use depends on the input tool used as well as the object shape, size and the effect you want to achieve. See Fill stitch types for details.Coil fill stitchCoil fill is suited to stitching narrow shapes or...
Read more »

Chenille stitch types

The two basic stitches created by chenille embroidery machines are moss and chain stitch. The looped pile look on letter jackets is created with the moss stitch which can vary from low, compact stitches to high, plush stitches producing different effects. The chain stitch is a flat stitch traditionally used as a border...
Read more »